I'm super-excited about this new macro, and thrilled to be able to share it. For bigger Service Units, it's a game changer on being able to send out individualized reports, but setting it up is a little tricky and you'll need patience, perseverance, and potentially some luck. I wish you the best! Here we go... ~Emilee
What does the macro do?
If you're here, I'm assuming you're familiar with the Active Troop Report put out by the totally awesome GSOSW Data Specialist team. While that is an absolutely glorious report and I used it heavily, it had some limitations that I felt a need to try to program around. My version uses Looker, the Certifications spreadsheet and the Troop Financial Dashboard and combines it all to make an On-Demand Active Troop Report that has these upgraded features:
- More robust conditional formatting:
- Flags individuals on the separate troop tabs that are missing background checks and/or training based on the role on that line of the data
- Flags background checks that are due to expire in the next 45 days
- Gives more info on the Financial Eligibility column so you don't always have to check the dashboard manually
- Flags troops that have missing F&F Volunteer and Cookie Booth Helper training in yellow
- Flags troops that are short on girls in green instead of red (so that red can just be used to indicate not qualified for sales and not in good standing)
- Flags troops that haven't completed Inside & Out Part 1 (FKA Day Trips) yet so Mentors/GEMs can reach out to get them out of their meeting spaces.
- Builds .csv files for all adults with the Troop Leader, Treasurer, and TPM roles so that the applicable Service Team member can import contact info into GMail automatically.
- Splits the individual troop tabs off into their own spreadsheets and PDFs for easier emailing.
- Creates a new spreadsheet that can be used to trigger emails to each troop's leaders with the following:
- Subject line contains Troop# so that you always know which troop is replying to you
- Can preload the body of the email via Notepad so that you don't have to copy/paste each one
- Their individual troop's ODATR files attached.
- Can include global attachments that you want every troop to get by just dumping the files in a folder.
- Sends all emails with the push of a pretty little button
- Saves a PDF of the Summary page that you can use for a clean screen-shot to post to your Volunteer page for a gentle name-and-shame to push troops to get the color off the report.
Requirements
- Super comfy working with Excel and VBA (if you don't know what this is, just stop now)
- Higher than average attention to detail and willingness to follow lengthy instructions
- Understanding that I (Emilee) cannot fix weird things happening on your computer. I'm not a VBA expert. I have a basic understanding of how the language works and use trial-and-error to piece all of the tasks I want the macro(s) to do from the results of finely honed Google searches.
- {Optional, but highly recommended} Caffeine
- Full featured version of Excel. Not Excel Online, not Google Sheets, must have desktop version of Excel. I'm not sure if Chromebooks count. I would guess if you can access VBA then they would, but I have no way to test that. Your mileage may vary?
- A GMail account that you use for your Service Team communications. For this macro, it must be GMail. And you will need to have Two Factor Authentication (2FA) turned on. (GMail accounts required this as of 12/14/23, so you're probably already doing this.)
- Internet access. Because you're going to be sending email. And downloading stuff.
- Looker access. The tool from GSOSW that lets you pull reports, specifically the Full Roster and the gsLearn reports.
- Troop Financial Dashboard access. The one that starts with "MY" and the 2-digit year, not the one with all the previous sale history and stuff on other tabs.
- Certifications Spreadsheet. It's in your Volunteer Reports folder.
- Reusable directory on your hard drive that isn't syncing with a cloud. Newer versions of Windows have the Desktop and Documents folders syncing automatically with OneDrive. Sure, that's cool that it backs things up, but it slows down the macro to the point that it dies a horrible death. Pick a spot that is not syncing anywhere. I made a folder called "ATR" in my Downloads folder. It works awesomely. Just make sure it's a place you can always find again and won't delete by accident. From now on, I'll refer to this folder as your ATR folder. So if you named it something else, just remember that its nickname is "ATR".
- The Macros and associated files. You can download them here.
Pre-requisite Setup Stuff
- Log into your GMail account.
- Click on your profile picture in the upper right corner and choose "Manage Your Google Account".

- Click on the Security option on the left.
- Scroll down to the "How you sign in to Google section and turn on 2-Step Verification if you haven't already. Once you have that set up, click the > on the side.

- Scroll down to the App passwords section and click the > again.

- Give it a name and hit Create:

- A box will pop-up with your password in it. It'll be 4 sets of 4 letters. You need to temporarily record this somewhere. Once you hit "Done", you'll never see it again. So really, copy it down somewhere for now.

- Back yourself out of your GMail settings. You're done there.


- Open the VBA editor. (Alt-F11 while you have Excel open.)
- From the top menu, click on Tools > References...
- In the box that pops up, scroll down to find the "Microsoft CDO for Windows 2000 Library" item and make sure the box next to it is checked.
- Click OK.

- Download the .zip file from me that contains all the ooey gooey macro goodness.
- Unzip it and put all of the files directly into your ATR folder. There should be no subfolders in there right now.
- Open "^BodyText (No Touchy).txt". I know it says No Touchy, but you can touch it this time. This is your default email text that will be sent by the macro. I've got it pre-loaded with what I use as my default. If you want to change anything, do so now. When the macro runs, it will copy this text file to a new location for you so that you can add/change text that's pertinent to that day before hitting send on the email. But this No Touchy copy will always be left behind so you don't have to retype the entire email body from scratch every time.
- Remove the security from the "^Send_ATR_Emails (No Touchy).txt" file. Otherwise it will believe strangers are convincing you to download malicious code off of the internet. Ummm. Hi, my name is Emilee. Not a stranger now! And my code isn't malicious, it's delicious! Anyway, right click on the "^Send_ATR_Emails (No Touchy).txt" file and choose Properties. Then click on the Unblock checkbox and hit OK.

- Open "^Send_ATR_Emails (No Touchy).txt". Yeah, yeah. It's again necessary this one time. If it asks you to enable editing, do it. While you have it open, hit Alt-F11 on your keyboard to open VBA.

- If it doesn't default to showing you the sendMail() code, then navigate to the VBAProject with the right spreadsheet name and double click on "Module1". Then you're going to go edit where the stars are in the screenshot below to be your GMail address and the App Password you totally remembered to write down a few minutes ago.

- Hit the blue save icon when done, then you can close VBA for now.
- Back on the ^Send_ATR... spreadsheet, go to cell D9 and type an email address that you have access to that isn't the one you're planning to use to send these emails from.
- In cells C3 through C5, replace "C:\Users\emilee\Downloads\ATR\" with the actual path to your ATR folder. You need to have the trailing "\" on the two that end in folder names.
- Save the spreadsheet.
- Hit the colorful "Send the GMail" button.
- You'll know you actually hit it if you get my warning box:

- And now you know that it thinks that it's done.

- Go check your email and see if you received the test message. This is the make-it-or-break-it moment. If your test email didn't work, it's time to go back to the beginning and make sure you didn't miss any steps. Until this test message works, there is no point to proceeding. You should also see the sent message in the Sent folder on the GMail you're using to send the messages.


Now that you know you can send a GMail message...
- Open Excel to a blank spreadsheet, go to the View Menu, and on the ribbon, select the drop down arrow under Macros and choose "Record Macro".

- In the box that comes up, make sure the middle drop-down says "Personal Macro Workbook" and hit OK.

- Go back to the Macros drop-down on the View Menu, and this time select "Stop Recording".

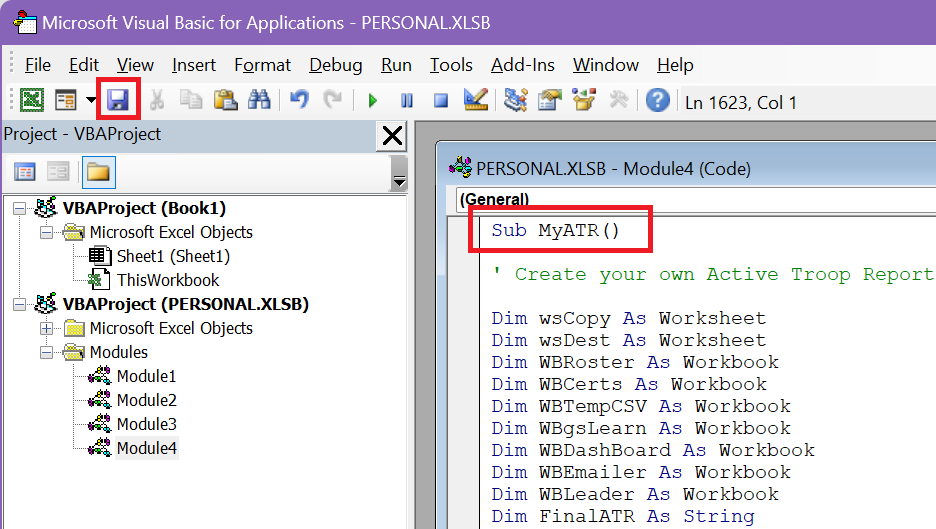
- While you're still in Excel, hold down Alt and hit your F11 key. This will open the VBA editor. On the left, you should see a directory structure. Navigate to the section that has "PERSONAL.XLSB" in the name, and go down to the Modules subfolder. If you have really never done this before, you should only have a Module1 here. If you have multiple modules, the one you're looking for is probably whatever the highest number is. (I obviously utilize macros heavily, so for my example, my little recorded macro stub was put on Module4.) Double click on the highest numbered module you have listed. You should see a little empty Macro1:

- Highlight everything in that newly opened box and delete it. We only recorded a macro so that it would create the proper infrastructure. We're going to replace it with the entire contents of the ATRMacro.txt document that was included in your download. So open that text document in Notepad, highlight EVERYTHING and hit copy. Come back into the macro window and paste all of that text. If you scroll back up to the top, you should have a first line that reads "Sub MyATR()". If not, you didn't copy/paste right, and you should probably delete everything in the Macro window and try again. When you see the right text, hit the blue save icon and then you can close VBA.

- To make it easier to run this macro in the future, you can optionally attach it to your Quick bar on the top left of Excel. Click on the drop-down at the end of your current Quick Bar and choose More Commands.

- In the box that comes up, change the dropdown to "Macros" (1), then scroll down, if needed, to find your new MyATR macro in the left side box (2). Click on it and hit the Add button (3) to put the MyATR macro on the right-side window along with any other Quick commands you may already have. Click on the MyATR entry on the right side window (4) then click on the Modify button (5) below the box. You may now select an icon for this macro. Personally, I use the one that looks like a file folder and an envelope because this macro generates a folder full of documents and lets you email them. Hit OK when done and you should now have a new button at the end of your Quick bar.